This article shows how to optimize a Docker image for a Ruby on Rails application both in terms of making the image as small as possible as well as how to improve the time it takes to create the image.
Motivation
We have two main motivations for optimizating the image creation:
- shrink the size of the resulting Docker image to minimize the storage space we need as well as the time it takes to move an image through the network.
- minimize the time it takes to build the Docker image so that we have a quicker turnaround (the time it takes from making a change to actually see it on our staging and production system).
Shrinking the Docker image
To have a point of reference we create a basic Rails application and package it as a Docker image using the following Dockerfile:
# Dockerfile
FROM ruby:2.6

RUN mkdir /app
WORKDIR /app
ADD . /app

RUN gem install bundler
RUN bundle install --jobs=8

CMD BINDING=0.0.0.0 /app/bin/rails server
A very basic setup using the default Ruby image for version 2.6. We have also add a list of Ruby dependencies that we typically use in our services to have the example resembling a real service as best as possible:
# Gemfile
source 'https://rubygems.org'

gem 'commonmarker', '~> 0.20.1'
gem 'elasticsearch', '~> 7.4.0'
gem 'faraday_middleware-aws-signers-v4', '~> 0.1.9'
gem 'github-markup', '~> 3.0.4'
gem 'httparty', '~> 0.16.4'
gem 'jbuilder', '~> 2.8.0'
gem 'pg', '~> 1.2.2'
gem 'puma', '~> 4.1'
gem 'rails', '~> 6.0.2', '>= 6.0.2.1'
gem 'sqlite3', '~> 1.4'

group :development, :test do
  gem 'dotenv-rails', '~> 2.7.2'
  gem 'minitest-ci', '~> 3.4.0'
  gem 'mocha', '~> 1.8.0'
  gem 'rubocop', '~> 0.68.1'
  gem 'rubocop-junit-formatter', '~> 0.1.4'
  gem 'rubocop-performance', '~> 1.2.0'
end

group :development do
  gem 'listen', '>= 3.0.5', '< 3.2'
  gem 'web-console', '>= 3.3.0'
end
The resulting Docker image generated by the Dockerfile above will be 1.05 GiB large.
Let’s pause for a moment: One Gigabyte for a simple Rails application? That sounds quite impressive. So let’s see if and how we can bring this number down.
Switching to Alpine Linux
The standard Ruby Docker image is based on Debian. So the first thing is to switch to a different base image using Alpine, which by itself is a much smaller distribution:
# Dockerfile
FROM ruby:2.6-alpine
...
However when trying to build our Docker image using the new base image we run into an error raised by the bundle install command:
sh: make: not found
The standard Ruby Alpine image doesn’t contain all the development tools and libraries that we need during bundle install (in this case make but a few others as well).
So we’ll need to add them manually before running bundle install:
# Dockerfile
FROM ruby:2.6-alpine

RUN apk add make gcc musl-dev sqlite-dev tzdata
...
Now the build completes successfully, and we get a new Docker image that is just 339 MiB in size.
Just by switching the base image from Debian to Alpine we’ve reduced our target image size by roughly two thirds. Not bad.
But there is still room for us to improve.
Adding only stuff that matters
With the ADD . /app command we copy the content of our complete Rails project directory into the Docker image.
Some of the stuff that’s copied however isn’t needed during the actual application runtime, so we can (and should) remove it from the generated image.
Docker respects a .dockerignore file during the ADD operation.
It basically works like a .gitignore file listing all the content that should not be copied.
Let’s create such a .dockerignore file and list the contents that we don’t want to have inside the image:
# .dockerignore
.git
.gitignore
.DS_Store
README.md
/Dockerfile
/env.*
/log
/tmp
Once again we start the build process and our resulting image now shows a size of 322 MiB.
For this example we didn’t save that much of space.
Depending on what metadata (or Git history) the project contains however this might be an additional block of data that is worth not having in the image.
So always add a .dockerignore into your project and think about what should go in there if you’re not copying distinct files into the image.
But we’re still not done yet.
Removing development and test dependencies
Going back to our Gemfile we can see that there are two groups development and test that are actually not needed for our production version of our application.
Nevertheless by default these dependencies are downloaded and installed during the bundle install operation.
To exclude them from the production version of our application we can configure bundlet to ignore these two groups:
# Dockerfile
...
RUN bundle config set without development test
RUN bundle install --jobs=8
...
After running the build we get to a Docker image that is now just 299 MiB large.
Another 20-ish MiB saved.
Overall we have reduced our Docker image size from 1.05 GiB to 299 MiB: more than two thirds! Not bad.
Now let’s look at the build times.
Improving the build time
Our typical continuous integration setup is to first test our application (which includes things like validating the code style and running the actual unit tests) and then create a Docker image (which is then pushed to a container runtime).
We’re using CircleCI as continuous integration server. A simplified version of our build configuration looks like this:
# .circleci/config.yml
version: 2.1

jobs:
  build:
    docker:
      - image: "circleci/ruby:2.6"
    steps:
      - checkout
      - run:
          name: "Resolve dependencies"
          command: |
            sudo gem install --force bundler
            bundle install --jobs=8
      - run:
          name: "Check code style"
          command: |
            bundle exec rubocop
      - run:
          name: "Run tests"
          command: |
            bin/rails test
      - setup_remote_docker
      - run:
          name: "Build docker image"
          command: |
            docker build -t betterdoc/example .

workflows:
  version: 2
  build_and_deploy:
    jobs:
      - build
After a successful build on CircleCI we get the following output:
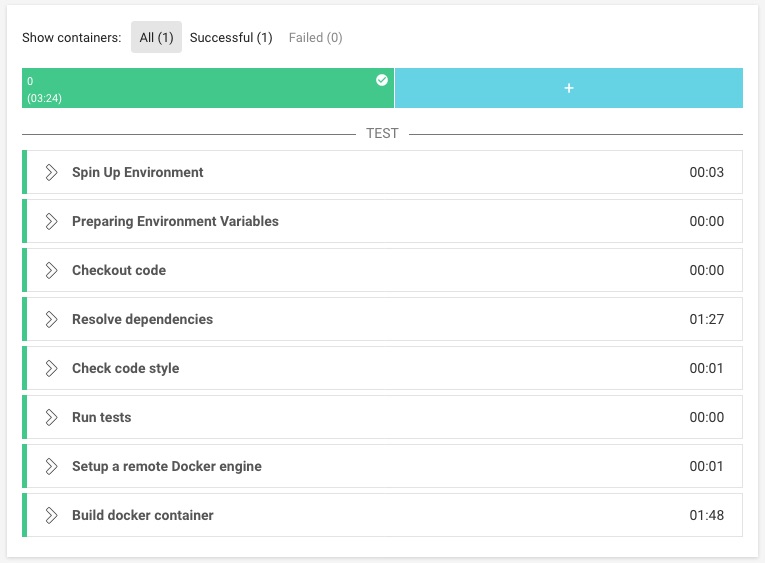
The total build time is 3 minutes 24 seconds.
Digging deeper into the output we see that almost all of the effort is spent in two tasks: “Resolve dependencies” (1 minute 27 seconds) and “Build docker image” (1 minute 48 seconds).
Stepping further into this we can see that both of these tasks spend the vast majority of their time in the bundle install operation, where the Bundler loads all external dependencies.
The first bundle install happens when we fetch the dependencies in order to run our tests. It’s defined directly in our CircleCI build configuration:
# .circleci/config.yml
...
- run:
    name: "Resolve dependencies"
    command: |
      sudo gem install --force bundler
      bundle install --jobs=8
...
The second bundle install happens when the Docker image is built and is executed inside the Docker image:
# Dockerfile
...
RUN bundle install --jobs=8
...
But basically the bundle install inside the Docker image does exactly what the bundle install run by the CircleCI build server has already done: Fetching the dependencies and making them available locally.
So what we’re looking for is a way to reuse the output from the first bundle install and put this into the Docker image so that the second bundle install doesn’t have to fetch everything from scratch again but can simply reuse what we already fetched.
Bundler allows us to create a deployment version of all dependencies referenced in our Gemfile for future usage, so let’s adjust our CircleCI build script to execute bundle install using the deployment option:
# .circleci/config.yml
...
- run:
    name: "Resolve dependencies"
    command: |
      sudo gem install --force bundler
      bundle config set deployment true
      bundle install --jobs=8
...
All our dependencies are stored in the vendor/bundle directory inside the current project.
As all the content from our root directory is included in the build context that is used when the Docker image is created, we can reuse the dependencies from vendor/cache if we also enable the deployment option within the Docker container:
# Dockerfile
...
RUN bundle config set deployment true \
 && bundle install --jobs=8
...
When commiting the new changes and running the build on CircleCI we can see a drastic change:
The “Resolve dependencies” task still takes 1 minute 36 seconds (which is to be expected as it still needs to fetch and install all the dependencies) but the execution time of the “Build docker image” task has been reduced to just 20 seconds (down from 1 minute 48 seconds).
The overall build time now is 2 minutes 7 seconds, so we already saved more than one minute (a third) compared to the original 3 minutes 24 seconds.
Caching dependencies
But we can still try for a little more: Most of the time our dependencies don’t really change that much from build to build, so downloading them over and over from the internet when we’re sure that we don’t need them seems like a waste of time and resources.
CircleCI builds however are ephemeral, which means that we cannot really save the resources in between multiple builds - or can we?
Luckily CircleCI does provides a way of caching resources (like our dependencies) between builds, so let’s do exactly that: Take the vendor/bundle directory and store its content after a build:
# .circleci/config.yml
...
steps:
  - checkout
  - restore_cache:
      keys:
        - bundle-
  - run:
      name: "Resolve dependencies"
      command: |
        sudo gem install --force bundler
        bundle config set deployment true
        bundle install
  - save_cache:
      paths:
        - ./vendor/bundle
      key: bundle-
...
Here we store the result of the bundling process into the CircleCI cache, using the hash of the Gemfile.lock file. Unless any of the included Gems inside the Gemfile.lock change the key will be the same and all the content will be fetched from the cache.
In this best case scenario (the Bundler can reused the resources from the cache) the “Resolve dependencies” task takes just a single second to complete, bringing us to an overall build time of just 36 seconds (down from the original 3 minutes 24 seconds).
A huge difference considering that a lot of changes will not touch the dependency list at all and therefore will complete incredibly fast.
Conclusion
By employing a series of rather small changes we were able to both reduce the size of the Docker image as well as the time it takes to build the image significantly.
We want to deploy our stuff to production as quickly as possible and although a few hundred megabytes of data and a few minutes of build time don’t seem that much, saving this multiple times a day for multiple people starts to pay out rather quickly.
So we’re pretty happy with every megabyte and every second that we can shave off.